There’s a handy trick that I employ when I’m creating a Terraform configuration from scratch with a new cloud service or resource I’ve not used before - especially when that resource has a long list of possible configuration options and as a result, Terraform attributes.
Sometimes I just want to get something spun up quickly, especially when I’m experimenting. However, when experimenting with a complicated infrastructure, manual configuration in the GUI can be risky - in the sense that you may very well configure something, forget you did it, and then struggle to get it working again (been there, done that, wasted many hours!).
That kind of situation is where you can utilise the terraform import command, a command that in my experience at least is usually only dusted off when something’s gone wrong with your Terraform state or somebodies been naughty creating infrastructure outside of code!
You can quickly spin up new services and resources in the GUI without having to initially worry about how to code it in Terraform if you know about the import command. As mentioned above, it’s not always particularly clear how some resources should be defined, in terms of arguments, and in that case, it’s often quicker to initially create it in the GUI. For particular resources or services, there can be tons of configuration options and arguments that can be used in Terraform, and it’s not always immediately obvious which you need to use when you’re just getting started with building a configuration for a new service.
The beauty of using terraform import in this way is that when you get your resource configured exactly how you want it in the GUI, you can then simply import it into your Terraform configuration and state. The trick is to use the standard template in the Terraform Provider’s documentation. This should usually give you the bare minimum amount of code required to perform the import, and then when you run terraform apply you’ll see what you’re missing (in a slightly unintuitive way that I’ll detail below), according to how you’ve configured it in the GUI.
Let’s take a really simple example using Microsoft Azure, and the azurerm Terraform Provider.
Have a look at the list of arguments that you can provide for a azurerm_linux_virtual_machine. Granted, not all will apply, but that’s a lot of potential arguments you need to wade through. As already mentioned, it’s not always immediately obvious what’s required, and what’s optional - and you can easily get frustrated. Well, the “beauty” (I use the term extremely loosely!) of using terraform import is, that initially, you don’t need to care, or even look at them!
Let’s pretend we’ve got a standard Terraform configuration already which has deployed a resource group, virtual network, public subnet, and a network interface. Now let’s imagine we’ve never used Azure’s Linux VM’s before. We can initially get started by creating a new VM in the GUI by following Azure’s VM creation wizard. That’s a helpful way of doing things when starting with new services because the step-by-step wizard will often give us important information on how we’re configuring the resource, and it’s the best way to learn (by doing).
Once we’ve created a VM, in our existing Terraform configuration we can paste the basic example from the azurerm_linux_virtual_machine documentation and update any references that aren’t applicable (such as updating the resource group name to match our existing group).
Here’s the basic example from the docs - don’t worry that it doesn’t currently match the configuration of your new VM. That’s the point!
resource "azurerm_linux_virtual_machine" "example" {
  name                = "example-machine"
  resource_group_name = azurerm_resource_group.test.name
  location            = azurerm_resource_group.test.location
  size                = "Standard_F2"
  admin_username      = "adminuser"
  network_interface_ids = [
    azurerm_network_interface.test.id,
  ]

  admin_ssh_key {
    username   = "adminuser"
    public_key = file("~/.ssh/id_rsa.pub")
  }

  os_disk {
    caching              = "ReadWrite"
    storage_account_type = "Standard_LRS"
  }

  source_image_reference {
    publisher = "Canonical"
    offer     = "UbuntuServer"
    sku       = "16.04-LTS"
    version   = "latest"
  }
}
Now switch back to the documentation, and run the import command described at the bottom of the page. Use the resource ID of your newly created VM in the GUI, example below.
terraform import azurerm_linux_virtual_machine.example /subscriptions/de49dd84-d70f-46f8-a5e9-ddc0bf8591cb/resourceGroups/test/providers/Microsoft.Compute/virtualMachines/test
As long as you’ve got the resource ID correct (which is not always as easy as it sounds), the VM will now be imported into your existing Terraform state.
azurerm_linux_virtual_machine.example: Importing from ID "/subscriptions/de49dd84-d70f-46f8-a5e9-ddc0bf8591cb/resourceGroups/test/providers/Microsoft.Compute/virtualMachines/test"...
azurerm_linux_virtual_machine.example: Import prepared!
  Prepared azurerm_linux_virtual_machine for import
azurerm_linux_virtual_machine.example: Refreshing state... [id=/subscriptions/de49dd84-d70f-46f8-a5e9-ddc0bf8591cb/resourceGroups/test/providers/Microsoft.Compute/virtualMachines/test]

Import successful!

The resources that were imported are shown above. These resources are now in
your Terraform state and will henceforth be managed by Terraform.
Now, here’s where the “magic” happens. Let’s run terraform apply and see what happens.
When the command has finished running, you’ll get some output that looks like the output below.
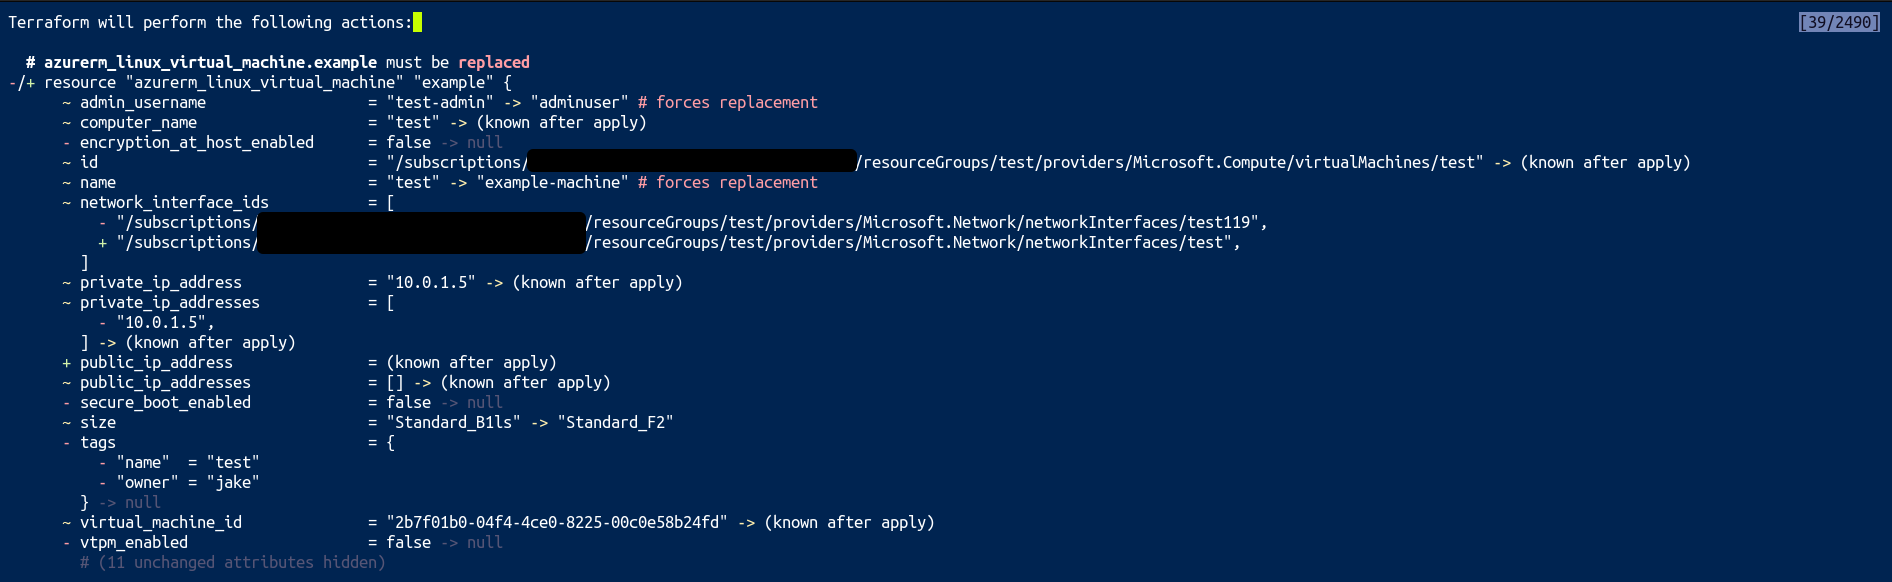
Don’t type yes, instead, look carefully at the red hyphens - and the yellow tildes ~. These are the attributes that Terraform is telling us do not currently match the Terraform state. It’s not immediately intuitive, but in other words, it’s what Terraform is going to remove, or update from the VM’s current configuration if you finish running apply. The unintuitive bit is that, these are the arguments we need to add to our configuration.
We can use this information to “cheat” our way to finishing our Terraform VM resource and bring it in line with how it’s been configured in the GUI. We’re ultimately trying to get to the stage where when we run terraform apply it reports back that there are no changes - that will mean we’ve successfully imported, and configured the resource.
You can now go through and add the missing attributes to your Terraform configuration, and if you’re not quite sure just run another terraform apply and see if you’re missing anything else.
Once everything matches how you’ve configured the resource in the GUI, then you’ll get the below output from terraform apply.
No changes. Your infrastructure matches the configuration.

Terraform has compared your real infrastructure against your configuration and found no differences, so no changes are needed.

Apply complete! Resources: 0 added, 0 changed, 0 destroyed.
That’s it. It’s a simple enough process to go through, but can be extremely helpful when you just want to get to grips with a new service quickly - and worry about the code later.